

Undulate Ray (Raja undulata) Image Processing
The pattern on the upper surface of an undulate ray is uniquely individual in the same way a human face is individual and recognisable. Photographs can therefore identify individual rays and monitor their return to a particular site over prolonged periods and over successive years. Image processing packages available on most home computers are sufficient to record and identify the patterns with confidence. These can be compared either manually or by freely available image recognition software to match individual undulate rays with photographs taken days, weeks or years appart. Comparison of images and recognition of individual fish is much easier if the photographs are first processed to the same size, colour format and orientation. There is no one single way to achieve this however it can be achieved in a variety of software packages. The following sequence is one way that has proved successful.
Ray Recognition
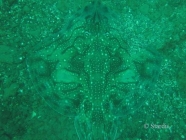
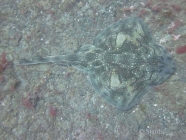
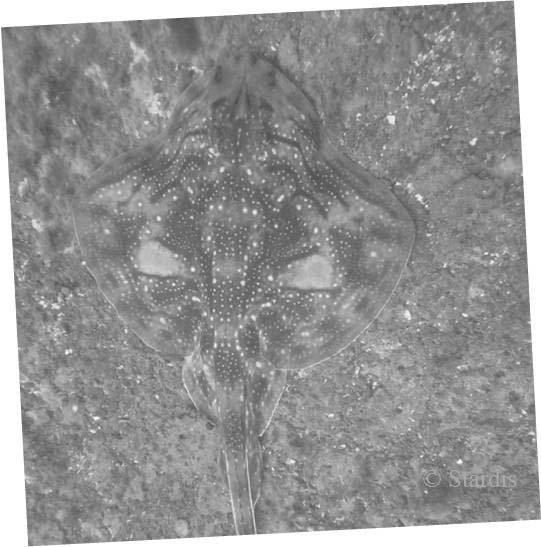
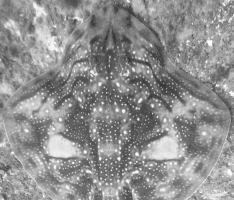
The rays are found resting on the seabed and most can be approached with care and photographed. Obtaining a good quality image is not essential, it is much more important to get the full width of the ray in the frame of the photograph. This allows a comparison of the pattern and especially the asymmetry of individual markings on the fish. Minimal equipment is less likely to disturb the ray and we have had most success by using a small, relatively low-cost compact camera, with natural light. The diver needs to be mid water, 1 or 2 metres above the fish and in UK waters this often this produces dark, greenish images of little photographic merit. These images can however by processed, relatively easily and single individual fish can be identified and matched to previous sightings of the same ray.
To compare two images and determine whether they are of the same fish, it is necessary to bring the photographs to the same size, colour format and orientation. There is no one single way to achieve this however the following steps have proved successful.These images are shown as downloaded from the camera without any procesing.
Step 1: Convert to Black and White
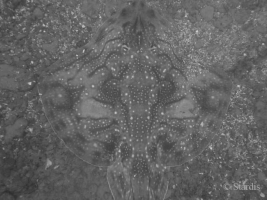
 Technique: Set the colour saturation to zero or use a B&W pre-set. This can be done in most picture editing software. An initial adjustment of brightness and contrast may also help visibility at this stage.
Notes: Colours are dependent on water depth, water clarity and whether a camera strobe or flash was used. They can be misleading as to the actual colour of the fish. Many of the photographs have a green hue due to the water depth and being taken without additional lights to avoid back scatter from particles in the water.
Step 2: Align to Vertical

 Technique: Rotate the image to align the centre-line of the fish with the vertical axis. Various image software packages allow the image to be freely rotated or rotated in degree increments. Some software packages provide an “Angle” tool where a construction line can be drawn along the back of the fish and the image is automatically aligned to either vertical or horizontal along the construction line.
Notes: Although not essential for visual comparison of images, the alignment does make subsequent cropping and resizing of images more precise hence this step is best done early in the process especially where the fish is at a noticeable angle in the image. Further minor adjustments to the angle may be beneficial when comparing images. Do not “flip” the image either horizontally or vertically because this will create a mirror image; always rotate through 180° if the image needs to be inverted.
Step 3: Perspective Transforms
Technique: Some software packages have a lens correction filter that allows horizontal and vertical perspective correction.
Notes: Providing the photograph is taken directly looking down on the fish, perspective correction is not necessary however it can be useful to correct images taken at an oblique angle that are otherwise less suitable for individual identification. There will be a limit to the effective correction that can be applied.
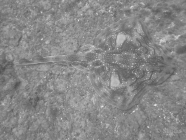
Step 4: Crop and Reposition
Technique: Crop the image across the width of the wings, i.e. the tip of each wing should be at the edge of the photo. The nose of the fish should align with the top of the photo either by cropping the top of the image or repositioning the crop tool.
Notes: The aim is to get the body and wings of the fish filling the image; the tail is considered of lesser importance for individual identification and may be trimmed from the image later.
Step 5: Resize
Technique: Width – adjust the size the image to a consistent width that will be used for all images but ensure the aspect ratio remains the same. Once the width has been set, the height of the image can be adjusted by cropping the bottom (tail of the fish) of the image.
Notes: IMPORTANT – Always ensure the aspect ratio is maintained when resizing an image otherwise the pattern will be distorted. Most packages have a feature that allows the aspect ratio to be locked during resizing. When cropping the image, the aspect ratio can be allowed to vary because this does not cause distortion.
Step 6: Brightness and Contrast
Technique: Manually adjusting both brightness and contrast can significantly enhance the pattern on the fish.
Step 7: Masking the Background for Computer Recognition
Technique: The background in the image, i.e. any area that is not the fish, is either erased or masked.
Notes: This is not necessary if the photographs are going to be manually compared but does improve the discrimination when computer recognition software is used. The computer system will otherwise use the background areas as part of the recognition process.
Comparing Images
Images of the rays can be compared manually or by freely available image recognition software to indentify rays that have been seen more than once. Where only a few comparisons are being made it is easy enough to do this manually as described below, however, as the number of images increases computer recognition software can be of significant assisitance. In this project computer recognition has been used to identify likely matching images, greatly reducing the amount of manual comparisons needed.
Computer comparison of ray images
Prior to pattern matching the images are processed as above to be the same size, colour, format and orientation. The software application used is “Wild-ID”, freely available as a download from the website of Dartmouth College, Hanover, U.S.. The software compares each new image against previously stored images, provides a numerical matching coefficient and displays the most likely matches. This technique has been found particularly successful with the poorer quality images where patterns are visually less clear. The computer is still able to find a likely match and more time is then devoted to the visual comparison.
Visual comparison of ray images
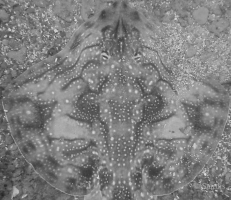
The final decision on whether two images match is essentially a manual observation, comparing sections of pattern between two images. Individual identification of each ray is based on their markings, which are asymmetrical on the wings, body and tail. It is particularly effective to compare differences between left and right wings of the fish and ensuring these occur on both photographs. Where the same fish is in two separate images the similarity is striking. Conversely if there is doubt when comparing two photographs, it is thought unlikely these will be the same fish.
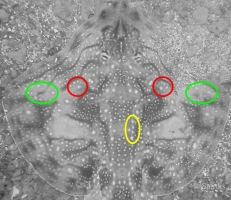
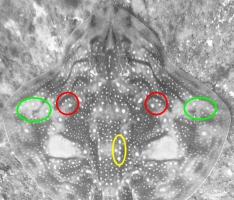
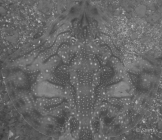
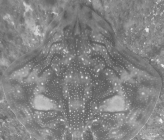
Comparing the highlighted portions above; the red circled areas show the same asymmetry of white dots on both images; the yellow ellipse highlights a similar asymmetrical feature on the fish, make sure to compare both sides of the fish even though only one side is highlighted; and the dark line marking in the green ellipse area, again comparing both sides of the fish in both images. Any number of features can be selected in this way; these three are just examples to show the technique.
The particular ray used in this example is "Garay"; the original photographs were taken in 2013 about 1-week apart. Details of other individual rays that have been seen more than once are included on the adjacent web page.